While this is the most common install method, there are other options if you cannot mount your kitchen island to the floor for any reason. Instead, you can create a kitchen island that “floats.”
I’ll explain how to quickly build a floating IKEA kitchen island with cabinets in this quick guide.
You can watch the full video below or keep reading to learn more.
Materials for a Floating Kitchen Island
First, you’ll need the same cabinets and side panels you want to use for your kitchen island, floating or non-floating.
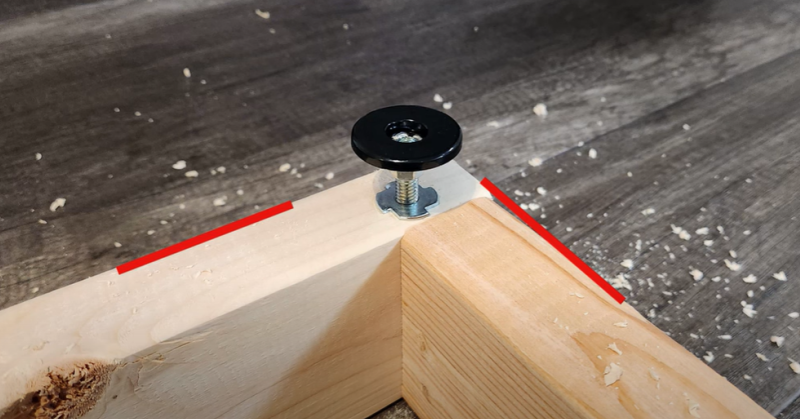
Additionally, you’ll need some construction 2x4s, some small adjustable legs, and some screws to secure it all together. We will use these materials to build a frame for the island to sit on.
One tip is to check your 2x4s before purchasing and find the straightest possible. They are not always straight, so picking straight ones will help keep your frame square and flat.
The adjustable legs will let you level the cabinet on your floor.
Build the Frame for a Floating Kitchen Island
The length and width of your frame will depend on the size of the cabinets you’re using for your kitchen island. You’ll want it to be slightly smaller than your cabinets so that it is hidden underneath.
In my example, I used two cabinets 30 inches wide each for a 60-inch long kitchen island. Therefore, I built my frame about 59-7/8 inches long.
I like to make the frame 2.5–3 inches smaller in depth than the cabinets to leave enough room for a toe kick at the front.
Next, put a support in the middle of the frame wherever the two cabinets meet. Since I used two cabinets in my example, I just put one support in the middle.
This works because the force of the weight on the countertop comes down through the sides or the end gable of the cabinet, not in the middle of the cabinet.
Put The Legs On
Finally, install the adjustable legs. Install one leg on each end of each cross beam. In other words, two on the left end, two on every support beam, and two on the right end. Be sure to place your legs back away from the face of the frame so all the feet will be hidden under the cabinet, not sticking out.
Attach the Cabinets to the Frame & Add Panels
Once all the legs are installed and adjusted, flip the frame over and put it in place.
Assemble all your cabinets as usual for kitchen islands, and place them on top of the frame before you attach them to each other. Once the placement is correct, secure your cabinets to the frame with a few screws through the bottom of the cabinets, front and back.
Once the cabinets are secured, you can add the side panels. I typically like to install the panels so they run almost to the floor. However, leave some space from the panels to the floor, allowing you to fit a flat spanner underneath and adjust the legs if needed.
The last item on the agenda is to add the toe-kicks. The Ikea toekick can not be clipped on as usual, so you must attach it with a few screws, which you place as high on the toekick as possible so you won’t see them.
You can also cut up a panel to use it as a toe-kick.
PRODUCT RECOMMENDATIONS
Please read before proceeding: Disclosure.
As an Amazon Associate, I earn from qualifying purchases.
I take pride in promoting the tools and products featured on this website. If you choose to click on a link and make a purchase, I will earn a small commission at no additional cost to you.
It’s important to note that my recommendations are solely based on my personal experience with each tool or product. I genuinely find them helpful and valuable, and the commission is not the driving factor behind my endorsement.
I have tried and tested every single tool I recommend – no exceptions.
I encourage you to only invest in these tools or products if you genuinely believe they will contribute to your goal attainment.
Go Green and save batteries
This is the third laser level I bought since I started to install kitchens, and hopefully, the last. It uses the same battery as my power tools and can run for a long time on a full charge.
This one has a green laser light, making it much easier to see the lines in broad daylight.
It is not a cheap tool, though, but I would have saved quite a bit of dollars if I had bought it, to begin with, instead of purchasing more affordable options twice.
Since I use the laser for a lot more than just checking ceilings and hanging rails, it has been money well spent for me.
Before digging in and spending money on this pole, I clipped my (first) laser to a few suspension rails resting on something high in the corner of the room. Sounds time-consuming and complicated, right? Well, it was.
Also, I had to figure out an alternative way to position the level when installing the last suspension rail.
Now, with this pole, I put it up in a favourable position, and it just sits there during the entire installation, allowing me to move my level up or down easily.